Go Big or Go Home: The Advantages of Audio/Visual Whiteboard Presentations

 | We’re happy to present a guest blog post from Ben Kobulnicky, a visual communicator and consultant specializing in corporate business explanations. |
|---|
Whiteboards are great for visually sharing nearly any type of idea, and you’ll find them in school rooms and board rooms alike, used for teaching, collaboration, and brainstorming. I confess: I LOVE whiteboards. I carry a pack of colored dry erase markers to my meetings in the hope that each conversation will require a bit of visual clarification. But for as much as I enjoy visual explanation, the physical whiteboard has one serious drawback: to understand what was drawn, you had to BE THERE in person to absorb the context and conversation or else the end state of the drawing isn’t very useful.
I first experienced this frustration back in college. “Which came first? This feels impossible!” I remember thinking as I desperately stared at my notes, trying to mentally recreate my professor’s lecture from weeks prior. Having diligently copied everything he had written on the whiteboard, I had the final state of the professor’s diagrams in my notes, but there was no way to replay it to recall the progression of the lesson leading to that mess of sketches.
Decades later now, I’m on the business end of explanation and education work, and I have found this same challenge over and over: the need to replay a visual explanation and discussion — to scale to later audiences the original collaborative whiteboarding experience in a powerful form that maintains the harmony of thoughts, words, and visuals. Simply put, sometimes you need more than the final state of a diagram to get your message across. You need those visuals brought to life with motion and voice.
Let me quickly illustrate my point. What does this convey?
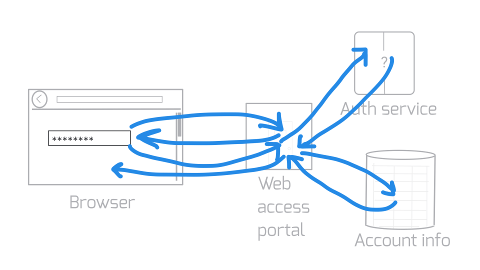
It’s so hard to tell, isn’t it? Seeing it being drawn, on the other hand, much better…
And by adding a voice to talk you through that…
It’s vastly superior to a picture of a whiteboard or a motionless diagram.
That’s why I started producing (what I call) Narrated Animated Whiteboard Videos, which are exactly what the name implies: videos based on a plain white canvas over which anything can be displayed, animated, or drawn, accompanied by spoken narration. Explain Everything provides all the features needed for this approach, and I’ve found my audiences respond very positively to the result.
You might think there’s nothing particularly unique about talking over a plain background while drawing & animating illustrations/diagrams, and indeed many teachers and explainers have, with varying style and content, leveraged this type of video. (e.g.: Kahn Academy, Common Craft, RSA Animate.) The ultimate strength of the approach lies not in the form, but in having the narration and visuals complement and enhance each other so fully that the experience unlocks the concepts for your viewers in a more complete way.
Here’s the loose process I use to create my videos:
- Ideation: start with any inspiring, provocative, or important key thought.
- Write: Develop and discuss your concepts fully as written words, sentences, paragraphs.
- Script Narration: rewrite in a conversational tone, as if you would speak to a friend or small audience. Write how you usually talk, because you’ll be reading this aloud later as you record yourself. The key here is to plan for your narration to sound like it is speaking directly to your audience in place of YOU being there with them in person.
- Visualize/Storyboard: come up with visual ideas that will match your spoken words. Note/sketch ideas for meaningful visual elements that help bring the message to life in a way which viewers would be able to relate even if the audio were muted. Work hard to conceive visual ideas that complement, clarify, and enhance your written narration.
- Record audio: read your script into the microphone to capture your message. If you mess up, do a retake (or use an editing feature of software to easily trim out the mistake.)
- Produce visuals: draw and/or source your visual elements listed in your storyboard. Explain Everything not only provides capabilities for creating art from scratch but also enables importing a wonderful array of file formats. Use it all! (Inside trick: sometimes I import a photo, lock it in the background to trace over it and then delete the photo, leaving only the artwork.)
- Assembly: import media and animate visual elements in synch with your narration, using motion meaningfully to reinforce the concepts behind your message. Explain
- Everything’s two recording modes come in handy here, as does the ability to tweak the timeline after you’ve recorded.
- Review & Publish/Export — you’re done!
One really important note: this process doesn’t have to be linear. Sometimes I start by writing words and later produce the visuals, but other times I start with the visual ideas and write the narration to match. The key thing is that in the end they complement each other and do not distract.
Though it can be hard work to conceive and plan all that audio-visual harmony, it pays off. Over time, I’ve received comments and feedback like this:
- “Fantastic!”
- “That really helped me!”
- “Best explanation I’ve ever seen.”
- “Drop the mic and walk away. Your job here is done.”
So I urge you: don’t leave whiteboards as wall hangings. Video has become the new mainstay for communicating ideas and concepts, and with Explain Everything, your digital whiteboard can be a communication portal — a new way to create, extend, and replay whiteboard sessions to audiences near and far.
Ben’s most recent video, Go Big or Go Home, was created on his iPad using almost every Explain Everything feature and can be viewed here:

